How to integrate with SAML 2.0
In this tutorial we will show you how you can integrate with your clients using SAML.
⚠️ The SAML integration is available on the Enterprise plan.
Last updated 4 months ago
¿What is SAML?
SAML (Security Assertion Markup Language) is an open code standard in XML that eneblaes que exchange of information, authentication and authorization btween different parties: an identity provider and a service provider.
The identity providers that work with SAML are: Google Suite, Open Athens y Azure AD and Shibboleth.
HOW IT WORKS?

Each user registered through SAML is created atomatically in the platform because of which all information added by and statistics associatted with the user are specifically associated to that user:
- Reading stats
- Highlights
- Notes
USER IDENTIFICATION
Each user is identified by a stable identifier sent by the identity provider (for example, their institutional username) and, when available, by their email address. Thanks to this identifier, the same user keeps a single account even when accessing from different integrations.
💡 For this to work correctly, ask the institution to have their idP release a stable identification attribute and the email of each user. If the idP does not send a stable identifier, a new account will be created on every sign-in.
CONFIGURATION
To stablish the connection between the institution and your store (that is idetifying your customer from the store side) you need to request the institution the following information:
- Entity id
- singleSignOnService Url
- singleLogOutService Url
- x509cert.
💡 All this information can be found in the XML metadata file of their idP (identidy provider)
Once you have that information:
- Go to Control Panel -> Settings -> Integrations, SAML Settings:
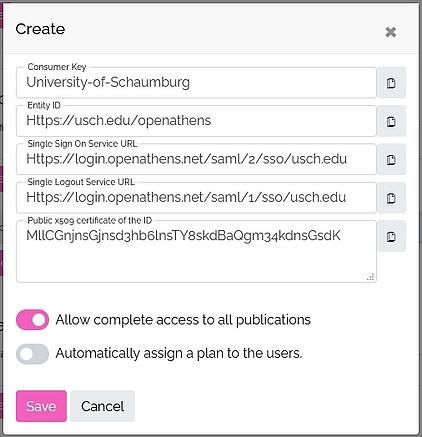
- Click on Create, and a pop up window will open:
There you will have to fill in the fields with the data provided by your customer.
In Consumer key you can add the name of your customer or something that refers to it. For example: "University of Schaumburg".
- Once you have completed the data, check if you want to Allow Complete access to publications or if you want to Automatically assign a plan to users.

When you have finished completing all the fields click on Save.
We have already finished configuring from your store side! 🙌🏼
Now we will show you how to get the data for your client to add us as an application from the idP.
- Click on Edit:
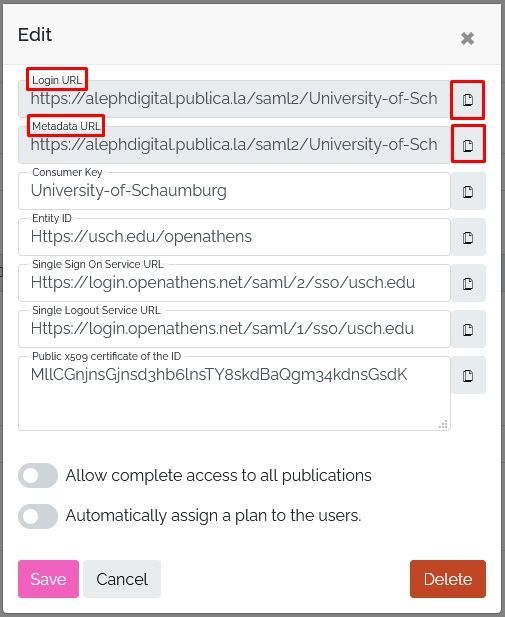
And this window will open where you will have available the login URL and the metadata URL to share with your client:

💡 Technical reference: the protocol details, endpoints and attribute mapping (including external_id) are in the integrations documentation: https://docs.publica.la/auth-integrations/auth-saml
⚠️ Users who sign in through SAML are created as regular users. To access the Control Panel, an administrator must sign in with email and password (SSO access does not grant administrator permissions).
TROUBLESHOOTING
| Symptom | Likely cause | What to do |
|---|---|---|
| The login form appears | The assertion does not include an email or identifier | Ask the institution to have their idP release those attributes |
| A new account is created on every sign-in | Transient NameID, without a stable attribute | Ask for a stable identifier to be sent |
| All users share the same account | The idP sends the same identifier for all readers | Review the per-user attribute configuration |
| The certificate is rejected | Expired or incorrect x509 certificate | Request the current x509 certificate |
We hope this tutorial has been helpful but you have any further questions please contact us at [email protected].