Add a custom logo to users
In this article we will show you how to add a logo that users will see when entering the store.
Last updated 4 months ago
If you want to personalize your users' session by adding, for example, an institutional logo, we will show you how to do it in simple steps.
⚠️ You must ask us to enable this functionality by writing to [email protected]
1. Go to Control Panel > Users
2. Find the user you are going to assign the logo to and click the dropdown menu

. Choose the Add logo option :
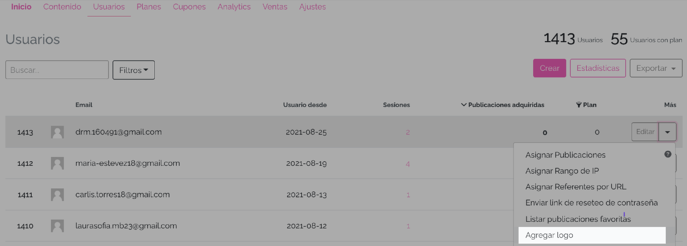
3. Choose the image from your computer by clicking on Select File or Choose File
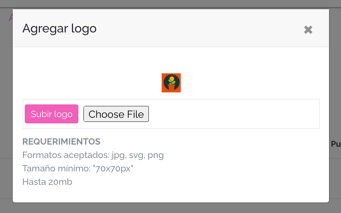
The image to be uploaded must meet the following specifications:
- Accepted formats: JPG, SVG, PNG
- Minimum size: "70 x 70px"
- up to 20mb
3. Finally click Upload logo .
Ready! Every time your user logs in, they will see the logo or image you added like this:

💡 Pro tip: If you want to center the logo so that it looks like this:

You can apply CSS styles by going to Control Panel > Settings > Advanced and adding the following code:
-
If you have the Custom CSS box add the following code:
.UserBrandingLogo img{ display: block; margin: auto auto !important; } -
Otherwise you can add the code in Custom before code
as follows:
<style>

.UserBrandingLogo img{
display: block;
margin: auto auto !important;
}

</style>
We hope this tutorial has been easy for you. If you have questions, write to us at [email protected] .